Showing posts with label experiments. Show all posts

Sunday, 3 March 2019

RGAFriday - Experiments with gum Arabic and India Ink

I am new to RGAFridays and was intrigued by this week's session with Clare Buchta as it featured gum arabic as a masking fluid with india ink.  I've never knowingly played with gum arabic and thought this would be a brilliant opportunity to try it out and learn with others.

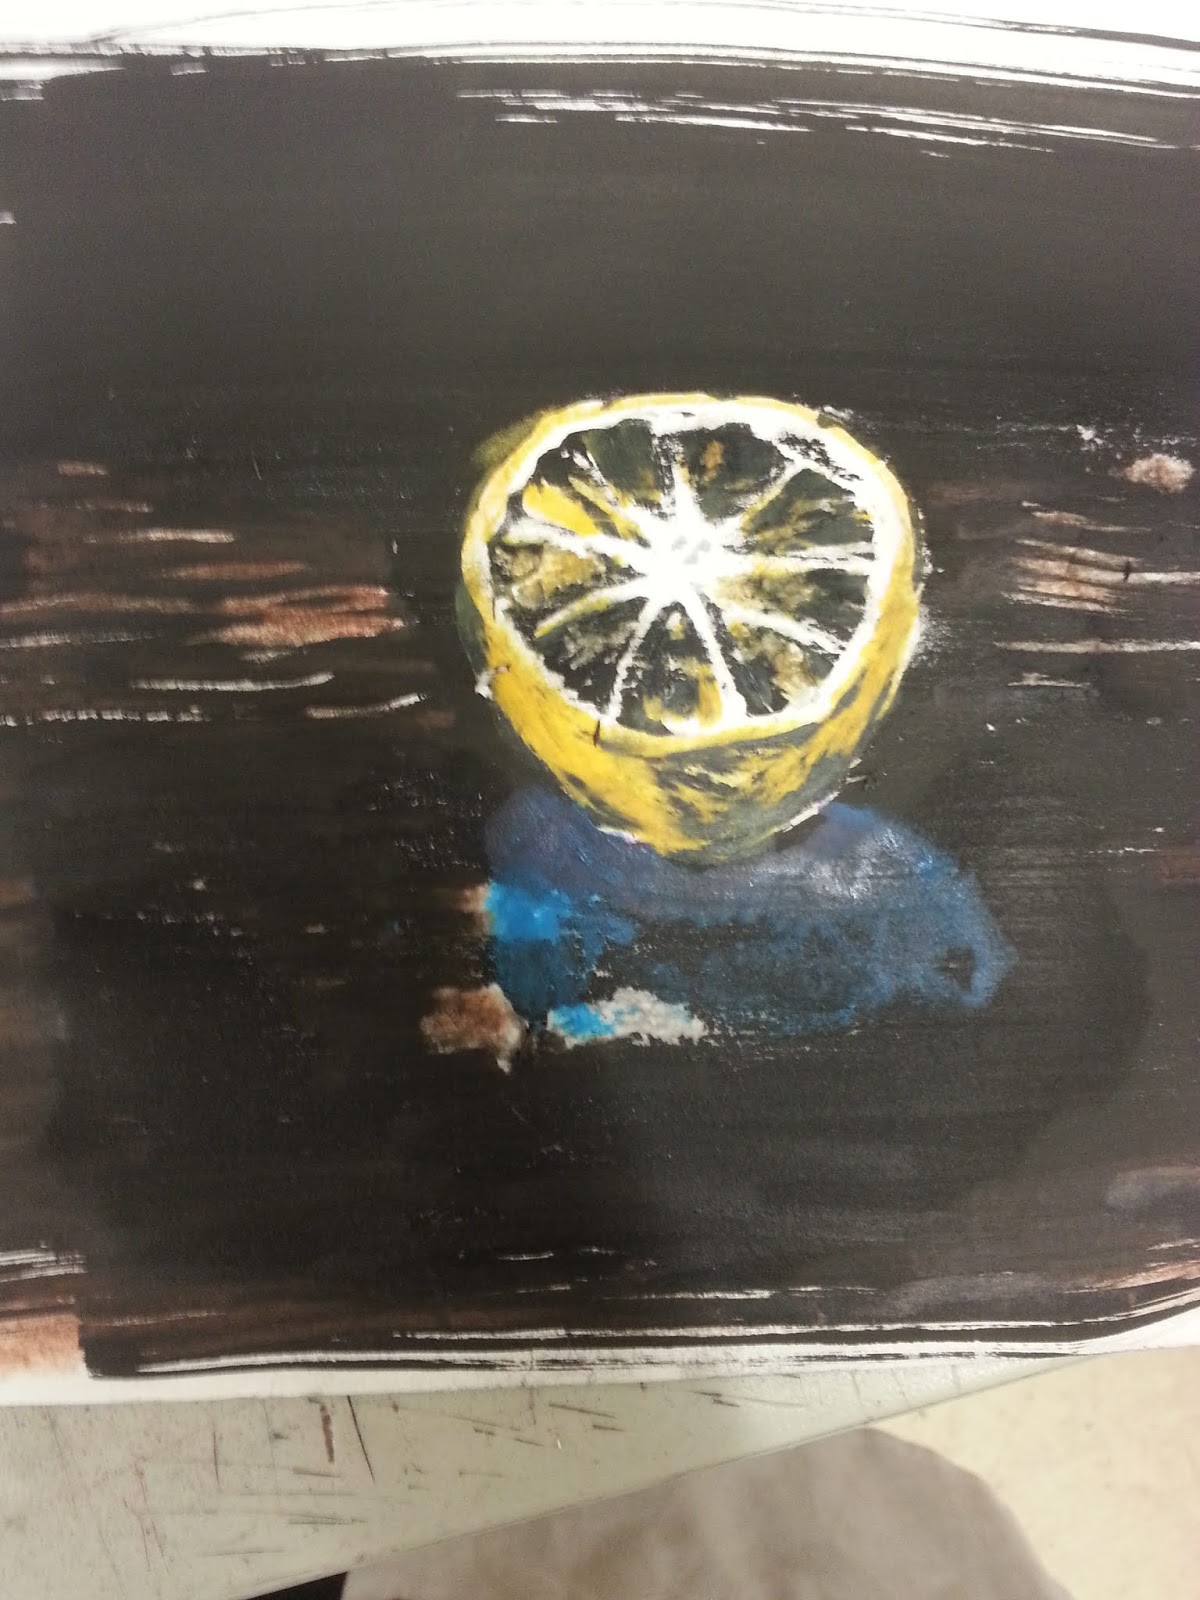
We painted with gum arabic (Clare suggested tinting with some watercolour so you can see what you are doing) on to paper that is ok to wash  - using fruits etc. as our inspiration. I took an orange half. 

We were to paint the bits we wanted to stay white - everything else would stay black. We could use our watercolour brushes, or any mark making implement like bamboo sticks that Clare had given to us.

Once the gum arabic had dried (with the help of a hair dryer), we painted over it using india ink 
note: do not use your precious watercolour brushes with india ink - it ruins them. 
There were two types of ink at the class -Winsor and Newton which seemed to give a black/almost sepia effect and also, Talens India Ink (brought in by Therese) that seemed to be really, properly black.

We waited for that to dry and then teased the gum arabic off under the tap gently with a brush that was only for the indian ink.

My experiments are below - I used textured watercolour paper, acrylic paper (that has an almost canvas like look, and smooth watercolour paper) - once the gum arabic was washed off, I used watercolours (Joan of Art), soluble wax crayons (Caran d'ache neo II) and some markers.
On textured water colour and lots of gum arabic marks. Realised that I had forgotten to mask out the orange skin. 
On acrylic paper done at the same time and so forgot the orange skin.


On smooth water colour - Messed up the marks in the segments but remembered to mask the orange skin

Again, seeing how people had used what they learned was fascinating. Here's one fab example of a pomegranate by Rosemary Harper

I looked up gum arabic section of Ian Sidaway's fantastic classes again in the watercolour course. Here's a link to the behind the scenes bit with him. Then found a few youtube videos about how you can use gum arabic to grlaze, bind, add the watery effect and promptly bought a bottle and put the India ink into the basket for later.

Yet again, the class was inspiring and am looking forward to March 15th's session with Emily Gillmor.  As they say on the site: "The cost per session is £6 for members and £7 for guests. An additional small charge is made if any specialised materials are needed or a model is involved. No need to book, just turn up. Everyone Welcome!"


Sunday, 24 February 2019

Going large on an RGA Friday


I've been an affiliate member of the Reading Guild of Artists since I met quite a few of them through the Urban Sketchers Reading group. Their 89th Annual Exhibition at the Reading Museum opens on February 27th 2019. Apart from exhibiting (if you are an exhibiting member), they run events, share opportunities and have various ways of joining in. They also run RGA Fridays which are fortnightly workshops during Autumn and Spring term-times and I went for the first time to attend "Enlargement to Abstraction with Cath Baldwin"

This intrigued me as I don't draw big - the largest being A4 as that's the biggest I'll do for urban sketching. Often my sketches are in tiny sketchbooks or A5/square notebooks that can fit into my handbag or pocket. I imagined this workshop would force me to draw really big but it did much more than that and I've been thinking about the lessons from this workshop since then.


The format

There were three workbenches set up each with different materials - one with flowers and foliage, one with fruit and vegetables (including a pungent onion that had been cut in half), and one with kitchen objects (metals) and I have to admit my heart did sink at this point as I don't really enjoy doing still life exercises as it reminds me of still life at school (and this was also set in a school). I'm glad I stuck it out here though.

We were asked to draw what we saw on A4 sheets of at least two of these workbenches using chalk, charcoal and india ink and concentrating on different ways of mark making to convey texture e.g. using different angles and tools. It was quite interesting to make different marks esp using different brushes and a wooden skewer (both ends) with the black ink. She warned us we were going to rip these drawings up for use in the next part. That intrigued me and I rather looked forward to that.

Stopping and looking at our and other attendees' work was very useful to encourage/inspire us and I know that my second sketch was of more interest to me than the first.

We looked at our drawings and Cath demonstrated the tearing of our sketches. We were asked to focus on interesting marks within our sketches in order to make a collage of the details we found. 

collage of torn parts from the initial sketches

Cath then encouraged us to zoom in on a part to enlarge and here's where it got really interesting. She went over why it wasn't simply going to be a magnified thickness to the lines and that we would have to look carefully at the line when enlarged as there would be textures appearing in these e.g. a brush line may seem solid but has the finer details of each fibre when inspected closely. We would have to maybe use different tools to convey the same interesting lines in their larger aspect. 

This was unexpected to me but obvious once she said it. She gave us a frame to help us (though Therese did point out to me later I could have just used photos and 'zoomed' in- another obvious lesson).


area I wanted to zoom in on with frame as an aid
We then moved on to A3 pages and started on these details. And this was hard for me but also fascinating. It was correct to call this workshop "Enlargement into Abstraction" as that is what some of our works would end up like.  
The largest piece (A3)

The enlargement (L) next to the original collage with frame (R)
Though I was disappointed when I realised we would 'only' enlarge up to A3, this quickly turned to relief because what I learned in the process was invaluable.

At the end of the workshop, I realised, it wasn't simply a matter of projecting on to a larger surface and drawing, as I had imagined (and even done in the past) - in order for the piece to retain its interest at a larger scale, I would have to pay closer attention to the marks that made the initial sketch interesting (including the negative spaces in the brush marks). This could even mean using different tools and techniques than the ones used in the initial sketch. Something my mind is still mulling over.

Many thanks to Cath and RGA Friday for this enlightening workshop.


Sunday, 19 August 2018

A year of sketching with the Reading Sketchers

I had heard about the urban sketching movement through Koosje Koone's SketchbookSkool klass a few years ago and desperately wanted a local chapter but never managed to find one though I did manage to find one very lovely person to have a coffee with regularly who was also looking through that community.

copyright Therese Lawlor
Thanks to Jelly's wonderful Open for Art Festival in 2017 I finally discovered Reading's urban sketchers. We have had at least one urban sketchcrawl every month come rain, (snow) or shine and last July we celebrated a year of doing these by taking part in the Open for Art Festival 2018 where one of our newest members Nichola wrote about the experience. We applied to become an official chapter but you can still find us listed on this map thanks to another of our members.

Urban sketching gives you a chance to meet others who are sketching the same location at the same time as you, but in their own style. You're alone but together drawing the world. The best thing about this is it gives people the courage to sketch in the open when strangers may speak to you - somehow, saying it's part of the sketchcrawl makes it ok. Secondly, you meet other people who share tips about equipment, books, other artists and of course experiences. In every meet up there's a new convert to pastels, water-soluble (or not) crayons, and Sailor Fude pens or discussing paper/sketchbooks (e.g.concertina & use of tinted or brown paper) and where to purchase them. I like the general buzz after having spent a couple of hours doing something for yourself sharing our experiences and excitement.  Sometimes people are reticent in sharing their sketchbooks but they find it is a lovely non-judgemental environment. Our group is on Facebook that you are welcome to request to join but recently we set up on twitter and Instagram (no posts yet!) so that it didn't exclude anyone from finding out about us.

I've included photos that a couple of our regular sketchers (and a new member) were happy to share for this post.
copyright Mohan Banerji by the River Kennet
copyright Therese Lawlor at Bel and the Dragon using pastels
Over the past year, we've been in Reading town centre (St Lawrence, Forbury, the Abbey Quarter, St Mary's Butt, Broad Street, Reading Museum, MERL, Blake's Lock and Bel and the Dragon, by the river), Sonning, Harris Garden and Wokingham

 Revisiting these places at different times or going to new ones is always exciting.


 copyright Liz Chaderton


copyright Therese Lawlor at MERL 

copyright Mohan Banerji at the Reading Hospitium
copyright Therese Lawlor in Forbury Gardens
copyright Therese Lawlor 

copyright Huma Jehan (sketching the freezing sketchers in Wokingham)


Sunday, 29 April 2018

Sneak peek at my submission to Sketchbook project


Yes the paper is very thin. If you would like to know a bit more about what works I wrote some notes up in September (not all the tools are there as I got more since) or you could replace these pages with your own and rebind the book. 

Saturday, 27 January 2018

Playing with aluminium

Jackson's Art had an art sale for aluminium panels that I found out about thanks to a fellow Reading Sketcher Mohan so I bought a couple and had a go after reading up on it

The easiest way to tackle the blank panel/canvas was to try doodling using some materials* and the end results were very pleasing in terms of effects.


The surface was cold and you did need to put something under your hand as you drew for your own comfort and to avoid smudging - as per their blog post.

Biro was the only thing that seemed reluctant (and unpleasant to use) . Bingo dabbers and posca pens seemed a bit duller but the other tools created a lovely vibrancy when used. Posca pens layered seemed to be better.

It would be lovely to carry these panels around as well as a sketchbook but may be impractical to do so every day.

*materials list

  1. Posca pen
  2. Faber castel pitt pens (fine and bold)
  3. Water
  4. Sharpie pen
  5. Pentel brush pen
  6. Sailor fude pen
  7. Lamy green pen
  8. Watercolours  (Winsor and Newton)
  9. Watercolour pens  (Winsor and Newton)
  10. Watercolour pencils  (with and without water)
  11. Biro (unsuccessful)
  12. Bingo dabbers
  13. Pentel stylo
  14. Gouache  (designer) Winsor and Newton


Tuesday, 28 November 2017

Hello Sailor!

The Sailor Fude pen, as recommended by Mike Daikubara in his book "Sketch Now, think later" is something I was wary of as I had never got on with calligraphy pens.

However, another Reading sketcher Mohan had a 55 degree nib and though I found it tricky to use, I was inspired to buy one.
I bought a 40 degree one which is supposed to better suited to smaller sketches according to online reviews and found that I really like it. All those line widths in just one pen. This has not led to a reduction in pens I still carry.


Here's a selection of some of my initial sketches using the Sailor Fude.


The Reading Sketchers are meeting again at MERL  11am on Sunday December 10, 2017.


Saturday, 14 October 2017

Mucking about with Storyboarder

Spotted a retweet by SydneyPadua to an article about a new, free storyboarding tool by WonderUnit called StoryBoarder  and decided to have a play.

I liked the Sketch sprint feature that generates a timelapse - you draw for a set time and it makes that into an animation. But it also reminds me that I need to play with the Slate (via iskn) again and I'm hoping to hook it up to StoryBoarder if possible (next experiment)

But I did play with it and generate an animated gif (just using mousepad and finger to draw very roughly) - it's not very sophisticated but it is quite fast and fun. You can likely spot the mistakes but a bit of practice will help (as with most things).


I decided to keep on adding drawings rather than using the onion layers, grids and the scaling tools in this particular example. However, importing a sketch and then trying to move it 'closer' was hard as I had to effectively move a screen (more to explore there as well).

Sadly, I couldn't find the Shot Generator - but I joined the facebook group to try and see if they can help.
UPDATE: So, it turns out (thanks to someone asking in the Facebook group) that if you scroll down on the right hand side you will get the Shot Generator. It doesn't look as if you can scroll but you can

Sunday, 10 September 2017

Sketchbook fright!


In May I first heard about the The sketchbook project 2018  (that you can take part in too till Jan 2018!) on a facebook post (thank you fellow SBSer). I decided this would be an ideal project to do so I bought the pack. After several delays that had me wondering if I had signed up for a scam, it arrived in June and I was so excited I tweeted about my lovely pack and did...
The pack /goodie bag
... absolutely nothing apart from pick it up from time to time, coo and put it back. 

The suggested themes for 2018
Eventually, after a month or two, I wrote the suggested themes down on the back to try and make a start. I also leafed through existing pages to see how they display the books and what seemed to work and what didn't.  I found out a bit more about  The Sketchbook project/Brooklyn Arts Library -a crowdfunded museum that runs several challenges. I wondered if I should have taken part in those instead. There's also a blog.
I did NOTHING else in the book - musing from time to time about the themes (which are merely suggestions that I am not bound by). 

It's September now, two other sketchbooks have been filled and a new one started. I've taken part in two sketching events run by the Reader Sketchers group and I've also taken part in two SketchbookSkool kourses ('Let's Make a Map' and Urban sketching). Still, nothing in this one.

Eventually, today, I gave up and sacrificed the back page to a sample page so I could see which tools I could use (and which I couldn't)


What to avoid:
  • Water causes the paper to buckle (not only on the page but also pages behind them). 
  • Watercolour markers with water leak into the back and the page behind. 
  • Promarkers leak into the back. 
In summary: So nothing with water and nothing with Promarkers.

What works?
  • Sharpies, Posca markers and bingo dabbers all work
  • Pitt pens work, as do biros, pigma markers (sent with pack) and lamy pen and ink (with VERY LITTLE water) work just fine
  • Watercolour brushes, watercolour pens and watercolour pencils (without water) add intense colours. 
  • Stamps work just fine.
  • Crayons work as you woud expect. There ate traces left of crayoyn on the pages.
Why so scared?
It's normal to be daunted of the blank page in a new sketchbook but I think the reason why this one in particular seemed scary was that it would be on show as a single PIECE of work so I didn't want to waste anything in it. Ordinarily, I am happy to scribble as each sketch is a single drawing that I can choose to ignore or adapt. I'm also fine with people leafing through my sketchbooks, and as mentioned, had completed two since then.

If there's one thing that may have helped, it would have been a couple of sample pages (so you could see what happened to the page behind) as it's not inexpensive to take part in the project.

Now to work out what to do and how to incorporate the buckled pages AND make another start.
After all, I have till Feb/March 2018 (allowing postage time).

Any tips gratefully received.